
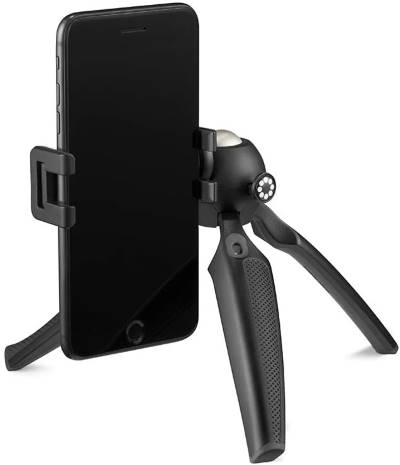
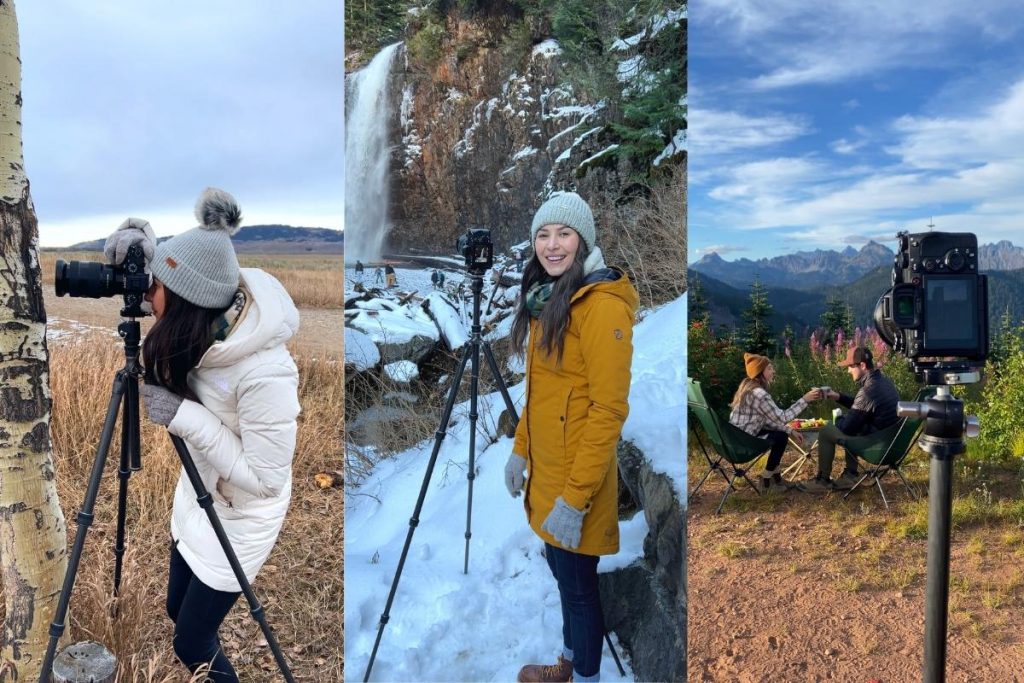
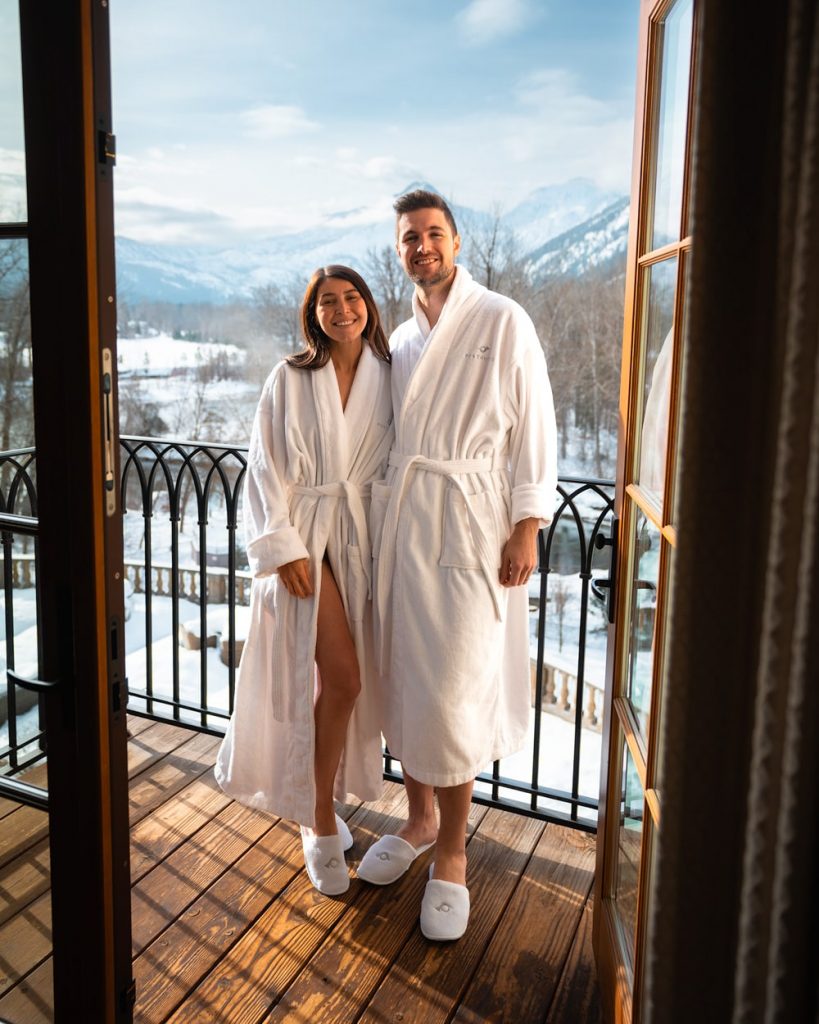
One of the questions I get asked most frequently is “what tripod do you use“? I often share travel couple photos that have been taken on a tripod, and occasionally I capture selfies on my own, also using a tripod. There are so many travel tripod options out there and I know it’s confusing to choose the best one… so let me help you!
In this guide, I am sharing the best lightweight travel tripod options, including phone tripods and camera tripods. I am featuring tripods for both everyday travelers and for professionals.
Disclaimer: This blog post may feature some affiliate links, which means I get a small commission if you make a purchase (at no extra cost to you). It’s one of the ways I can keep producing free guides and resources for my readers. Learn more about my affiliate policy here. Thank you for the support!
BEST TRAVEL TRIPODS of 2026
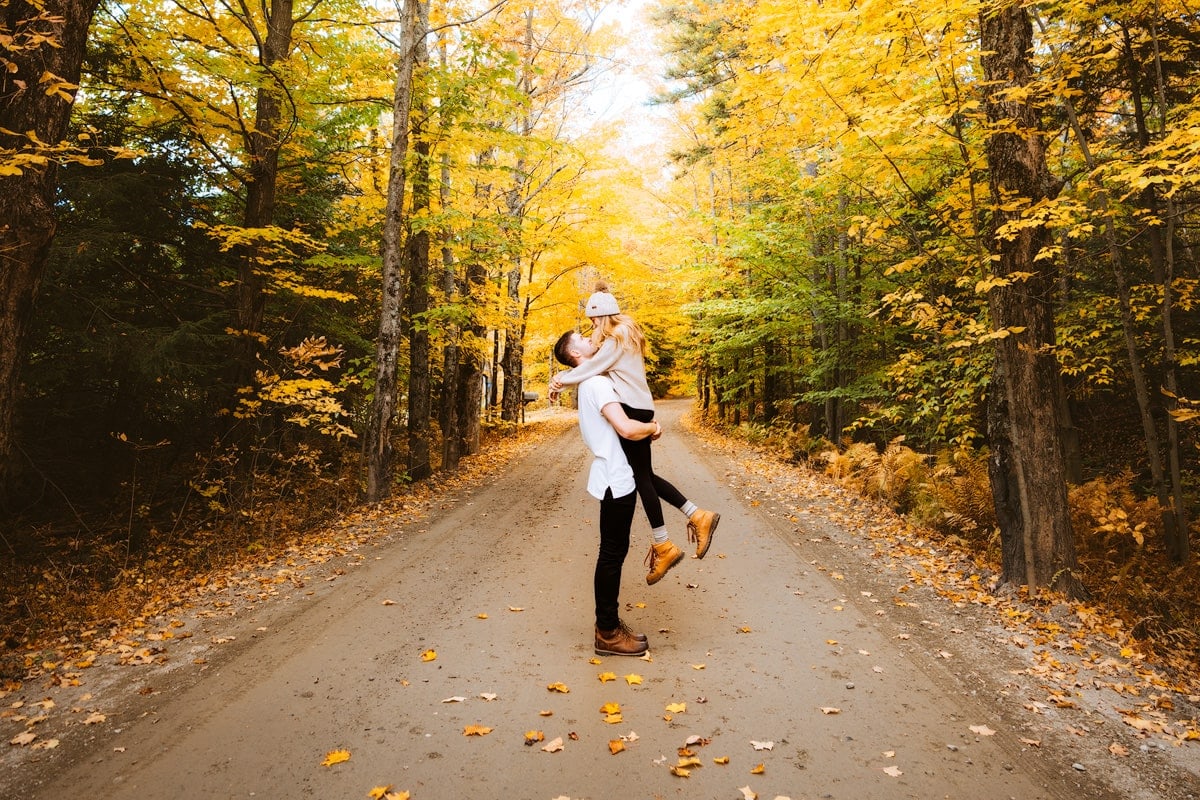
Why use a tripod? There’s nothing wrong with regular selfies where you hold up the phone or camera and snap a close-up photo. These are so fun and make great memories. But they also cut off a lot of the view and only really show your upper body or head.
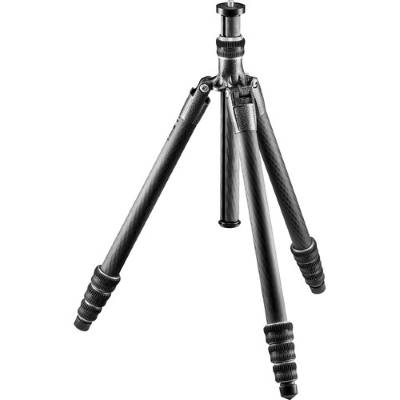
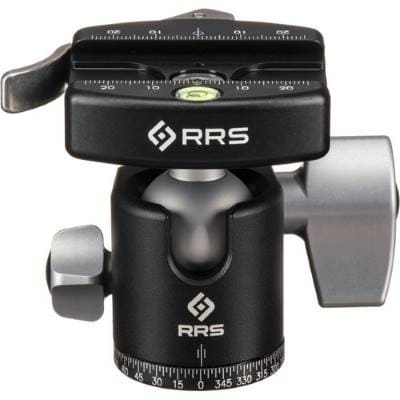
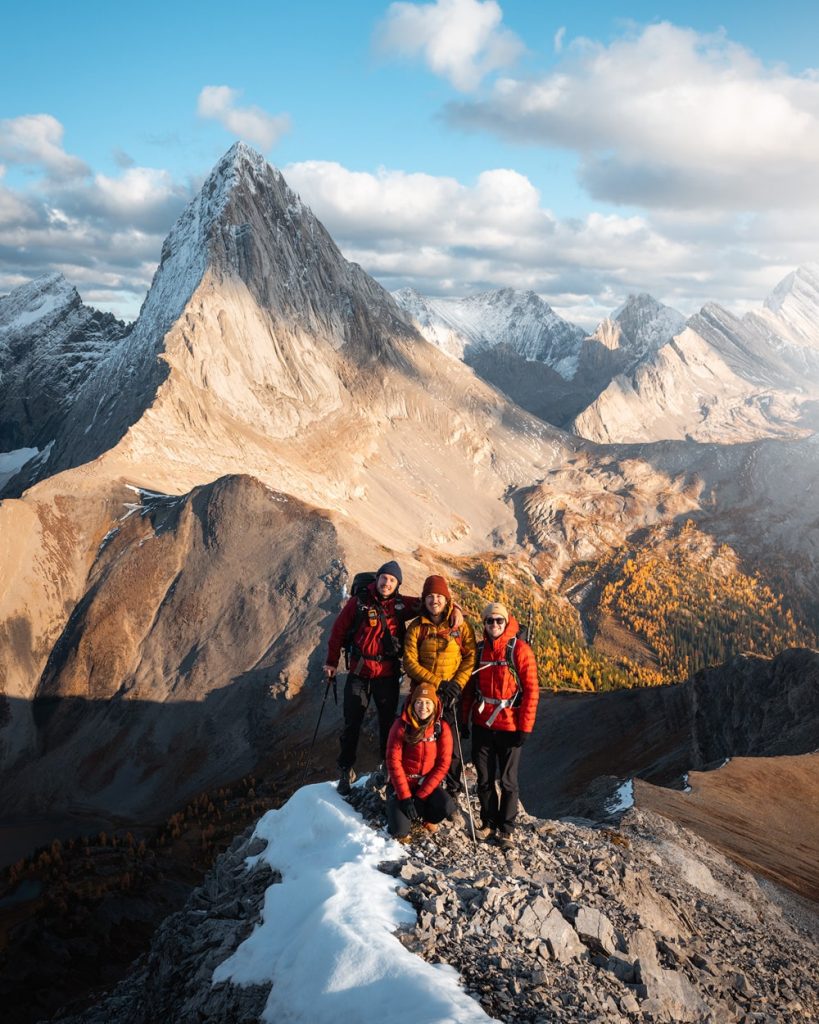
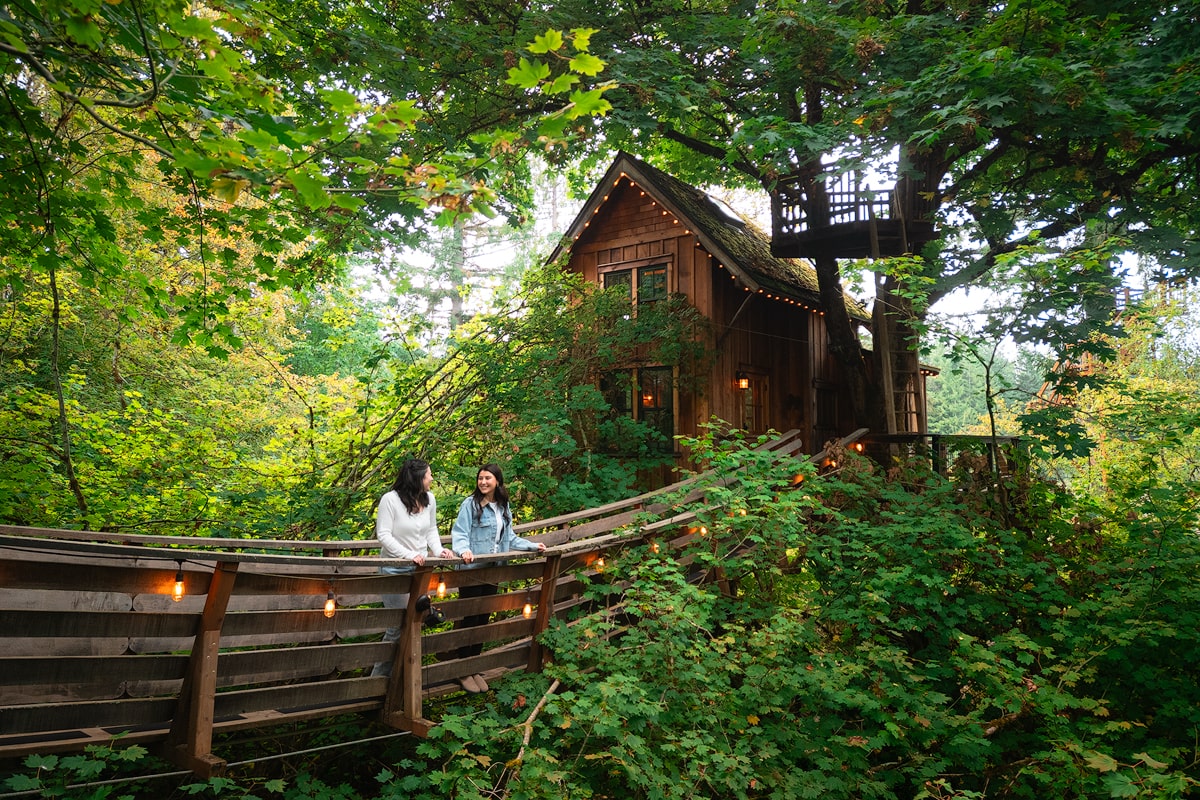
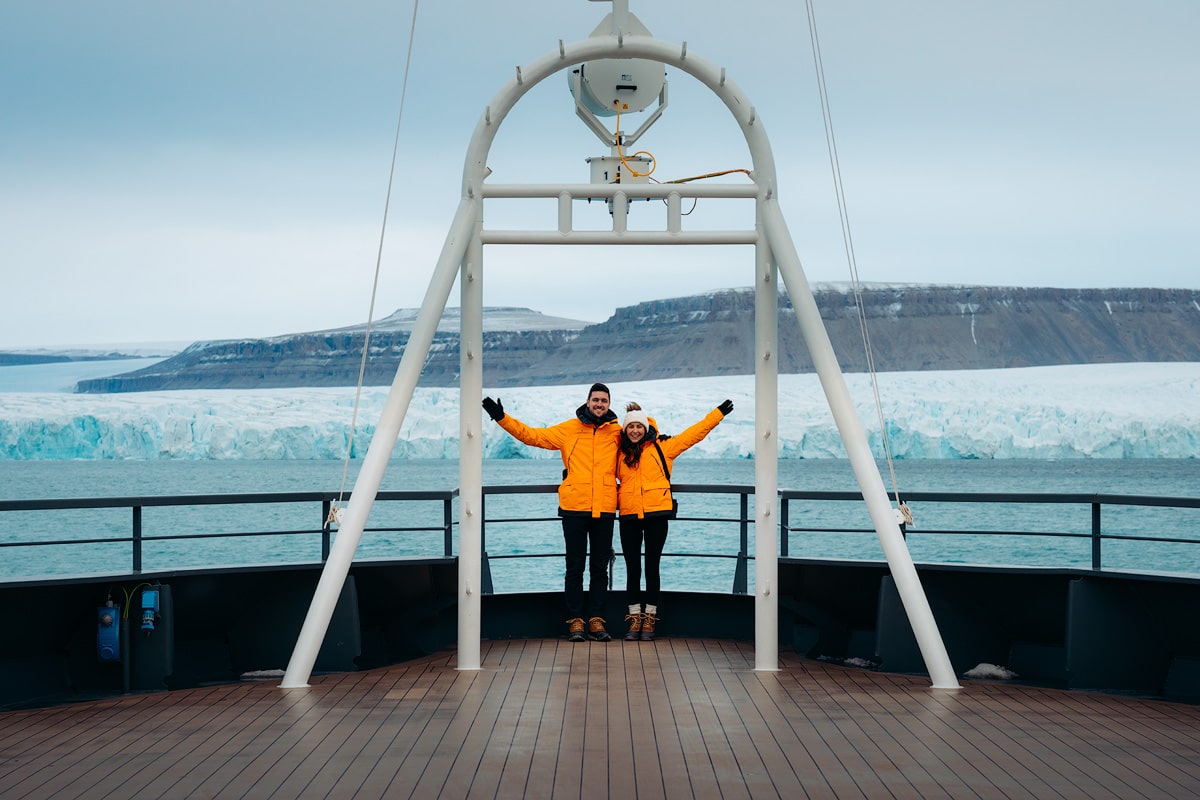
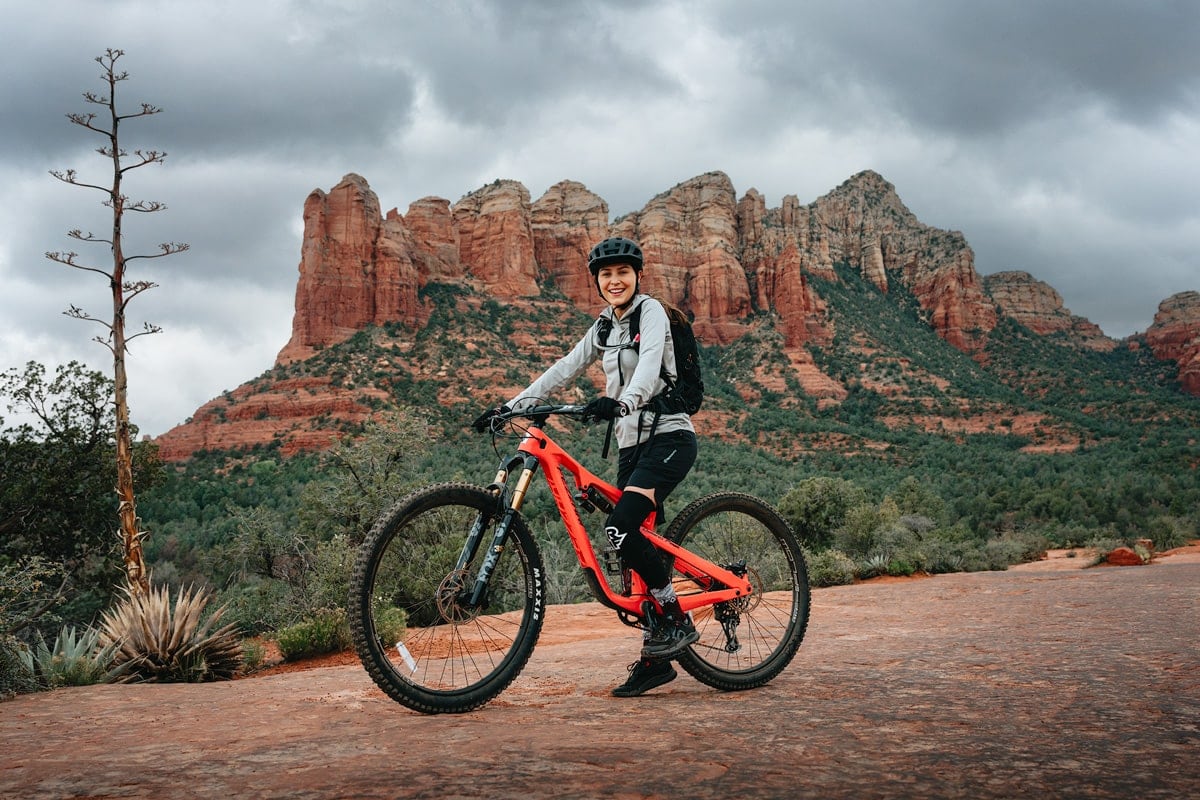
Using a tripod will allow you to take full body travel selfies as well as regular photos that require stabilization (e.g. long exposures, astrophotography). And when I say travel selfies, I am referring to taking photos solo, as a couple, with friends, with family, with your pets, etc.
In this guide, I am only recommending lightweight travel tripods. The reason being is tripods can get quite heavy and if you plan to travel with one, you really need it to be as lightweight and packable as possible. I also like to hike and backpack with a tripod, so having something small and lightweight is VERY important.
Best Phone Tripods for Travel
I often take photos and videos on my phone (iPhone 13 Pro) and find this to be such a quick and easy way to create travel memories. Below are my top options for phone travel tripods.
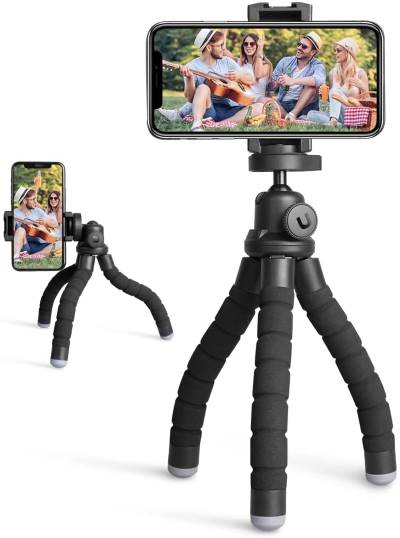
Cheapest Phone Tripod
The most affordable (yet still highly rated) phone travel tripod on the market is the UBeesize Phone Tripod. Coming in at $16 USD you can get a tripod that allows for capturing both vertical and horizontal photos/videos. It’s also flexible and can be wrapped around things like fences, poles, tree branches, etc.
Smallest Phone Tripod
There are numerous really small phone tripods on the market, but the issue is that a lot of them won’t allow you to shoot both horizontally AND vertically. If you don’t mind only having the option to shoot horizontally, then I recommend the Joby GripTight ONE Micro Stand or the JOBY GorillaPod Mobile Mini.

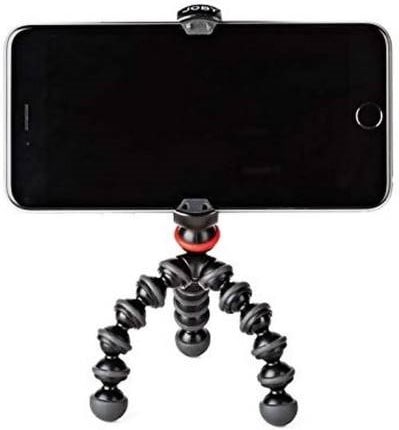
If you want the ability to shoot vertically as well, I think the smallest option available is the JOBY Handypod Mobile Mini Tripod with GripTight One Mount. Remember that these types of mini-phone tripods will need to be rested on something, e.g. a table, fence, car, rock, etc.
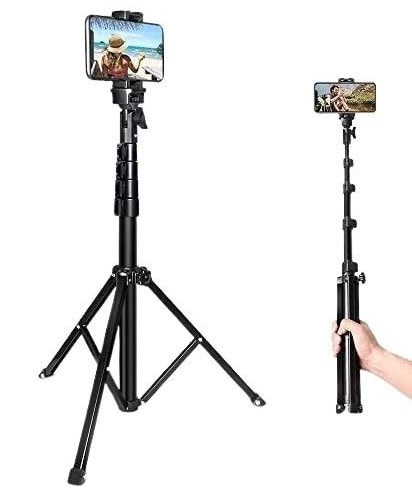
Extendable Phone Tripod
If you want to take full-body images then you should probably invest in an extendable phone tripod. This will allow you to have your phone at hip or face height. My top recommendation is the Aureday 62 inch Selfie Stick Tripod. This tripod can be extended to 62 inches / 5’1 ft, comes with a universal head mount, remote shutter release, and can also be used as a selfie stick. It can also be used with a GoPro or DSLR camera. Note that you may not be able to extend it all the way or use it vertically with a heavy camera.
Most Professional Phone Tripod
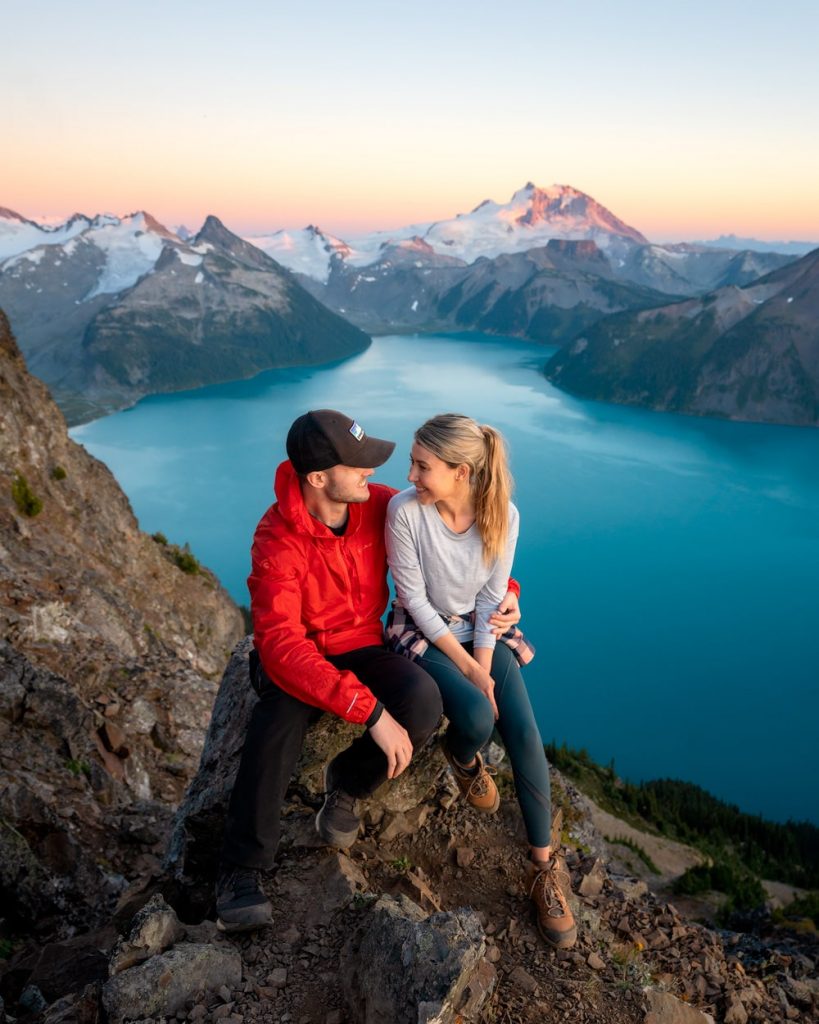
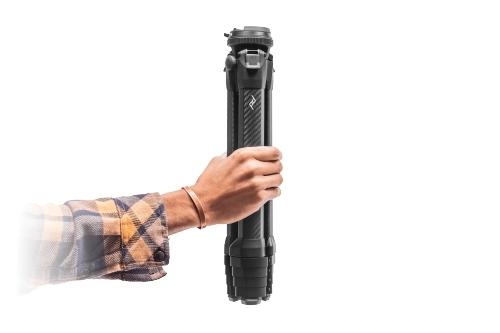
Now hear me out… the Peak Design Travel Tripod is expensive but it’s amazing for creating professional content on both mobile and camera! It’s sturdy enough that you can create long exposures and timelapse videos without the tripod shaking or risking falling over. It also extends to be 60 inches, can hold phones/cameras both vertically and horizontally, and can house up to 20 lbs of weight, including large DSLR cameras and telephoto lenses.

Already own a tripod for your DSLR or mirrorless camera? You can very likely buy a mobile attachment and use it with your existing tripod head/ball head. Just be sure to read up on the dimensions and requirements before purchasing. Some attachments to look into are the Peak Design Travel Tripod Phone Mount and the Ruittos Phone Tripod Mount.
Best Lightweight Travel Tripods for Cameras
There is a wide range of tripods on the market for DSLR and mirrorless cameras. I personally believe that if a tripod is lightweight and packable then you are much more likely to actually use it. So these recommendations are best suited for photographers who are on the go and need a travel-friendly tripod (including for activities like hiking and backpacking).
best Overall Travel Tripod
My most used travel tripod is the Peak Design Travel Tripod carbon fiber version. It’s super lightweight for a sturdy tripod that extends to 60 inches and can hold both a camera body & a large lens (e.g. telephoto). It packs down really small and can easily be stored in your luggage or in the side section of your backpack (a total length of 15.4”). The weight of the carbon fiber version is 1.29 kg (2.81 lbs), and the aluminum version is 1.56 kg (3.44 lbs).
The Peak Design Travel Tripod also comes with a built-in ball head and camera mount, so you won’t need to buy that separately. Like to shoot with an L Bracket? Read this article before buying.
Another perk of the Peak Design Travel Tripod is that it comes with a mobile phone clip, making it the perfect hybrid for creators who like to shoot with both their camera and their phone.
Should you choose the aluminum or carbon fiber version? If you don’t need a super lightweight tripod, then I recommend you buy the aluminum version. If you plan to hike or backpack with it then I would consider investing in the carbon fiber version.
Travel Tripod Most Loved By Professionals
If you’ve followed me for the while then you’ve probably seen me use the Gitzo Traveler Series 2 Carbon Fiber Tripod paired with a Really Right Stuff BH-30 Ball Head, and an L Bracket camera attachment. I bought this setup before the Peak Design Carbon Fiber Travel Tripod was released because it used to be the best lightweight professional setup available. I still love this option for the fine-tuning you can do with the Really Right Stuff BH-30 Ball Head and the ability to quickly change between vertical and horizontal compositions when using an L Bracket camera attachment. You can also pair the Peak Design Travel Tripod Phone Mount with this setup, making it functional for both mobile and camera.
The downsides of this setup are that it’s not as packable or as lightweight as the Peak Design Carbon Fiber Travel Tripod. When folded, the tripod packs down to be 17.5 inches and the ball head is a height of 2.9 inches, making it a total of 20.4 inches. This is short compared to a lot of tripod and ball head configurations, but for me as a petite woman, it’s quite tall to fit in the side of a backpack. In saying that, my 6’1 husband has no complaints. This setup comes in at a weight of ~3.71 lbs, which is 0.9 lbs heavier than the Peak Design. It’s also ~$315 more expensive than the Peak Design Carbon Fiber Travel Tripod.
So why would you choose the Gitzo Traveler Series 2 Carbon Fiber Tripod + Really Right Stuff BH-30 Ball Head over the Peak Design Carbon Fiber Travel Tripod? Right now Peak Design is still working on compatibility issues between the Really Right Stuff Plates and L-Brackets and their Travel Tripod. For example, the L Bracket I am currently using for my Sony a1 is not compatible with the Peak Design Travel Tripod head. And sometimes having that ability to switch between vertical and horizontal quickly is very important to me. So for now I am holding onto my Gitzo and RRS setup until Peak Design has fixed that issue.
Best Budget Travel Tripod
I know the last two options are expensive and not everyone has that kind of money to spend. There are definitely more budget-friendly travel tripod options on the market but keep in mind that they are cheaper for a reason. Usually, the more budget-friendly tripod options are heavier, less packable, and/or less sturdy.
The Magnus TR-13 Travel Tripod is a great choice for those looking to invest in a lightweight travel tripod but may not have the budget for something super fancy. The Magnus TR-13 can be extended up to 62.5″, folds down to 18.2″, and weighs only 2.9lbs! But it doesn’t hold as much weight as some of the more expensive options (max of 13.2 lb). So you’re going to find this tripod is less steady and possibly not as conducive to holding bulkier equipment like telephoto lenses.
Some other budget travel tripods to consider:
- Mefoto Roadtrip S Lightweight Aluminum Travel Tripod
- SIRUI T-0S Series Travel Tripod
- Manfrotto Element MII Aluminum Tripod
- Oben AT-3565 Aluminum Travel Tripod
How To Take Travel Selfies With a Tripod
There are a few different methods to taking selfies with a tripod. And these apply to any type of selfie, including couple photos, solo photoshoots, family snaps, capturing moments with your friends, or maybe even with your pets. These methods apply to both phone photography and DSLR + mirrorless cameras.
Different methods of taking selfies
- Using the self timer function
- Using a remote control
- Utilizing interval shooting / intervalometer
1. Using the Self Timer Function
This is probably the easiest option and works for both mobile and camera. It’s super simple, you just turn on the self timer function (all phones and cameras have this) and run into the frame! For iPhones, you can set the self timer to be 3 or 10 seconds. I recommend 10 seconds because then you will have more time to run into the frame. I often use this method for very quick selfies when I know I can be close to the phone/camera and will only want 1 or 2 takes.
- Pros: free and easy to use
- Cons: you have to stay relatively close to your phone/camera and can only take 1 photo at a time
2. Using a Remote control
Using a remote that connects to your phone is a popular choice for taking selfies. This means you can click a button on the remote and it takes a photo on your phone. This method can also be used with DSLR and mirrorless cameras when the brand has a compatible app (e.g. you download the app on your phone and then use it as a remote to click your camera’s shutter from afar). I have used this method in the past but I find it annoying to have to hide the remote / my phone each time.
- Pros: affordable and easy to use, you can be further away from the camera, you can take multiple images per shoot
- Cons: it’s annoying to hide the remote each time, they often have fairly short ranges so you still can’t go too far away
3. Utilizing Interval Shooting
This is my preferred method for taking selfies on both my phone and camera. When using a phone, you will need to download an Interval Shooting app (e.g. Lens Buddy or Lightning Lens). If using your camera, you will need to use the inbuilt interval shooting function (or if you camera doesn’t have this you can purchase an external intervalometer).
Choose the speed, how many photos you want it to take, and whether or not you want a delay/timer at the start (so you can get into position). For example, you may choose for it to take a photo every 2 seconds, with 20 photos total, and a 15 second timer at the beginning. I love this method because I can move around freely and pose in all different ways. It’s also great for a group setting because you’re bound to get an option with everyone’s eyes open if you have 20 takes!
I have an Instagram Reel that shows me using this feature on my Sony a1. Click here to watch.
- Pros: you can easily take many photos in one go, don’t need to worry about hiding a remote, can get as far away from the camera/phone as you want
- Cons: not an option for all cameras and doing this on the phone requires an additional app
Final Thoughts on the Best Travel Tripods
I want to finish off this guide by saying that you shouldn’t feel embarrassed or worried about using a tripod in front of others. Who cares what they think?! Some of my favorite photos have been taken with a tripod and they make such amazing memories. For example, I wouldn’t have nearly as many photos with my husband and or with my friends if we didn’t travel with a tripod. So put those worries aside and just give it a try 🙂
PIN for Later!


The point about lightweight tripods being more likely to actually get used is so true.
Great roundup! A reliable travel tripod can make a huge difference when capturing landscapes, cityscapes, or low-light shots while on the go. I especially appreciate tripods that balance stability with portability since packing light is always a priority when traveling.
Great recommendations! I’ve been looking for a versatile tripod that works well for both my phone and camera, and this list is super helpful. I didn’t realize how compact some of these models are. Can’t wait to try out the ones you mentioned!
Your blog is a great resource.
These tripods are amazing as it helps a lot in making videos. I make the videos and upload on Tabootube.
yes, These tripods are amazing as it helps a lot in making videos. I make the videos and upload on Tabootube.
Selecting the ideal travel tripod of 2026 allows you to effortlessly document every moment, and this UP Scholarship deadline page assists students in organizing and ensuring their applications are submitted on time. Concise, helpful, and prompt — I appreciate the excellent information
Really practical and well-explained guide. I like how you focused on real travel needs like weight and portability instead of just listing specs. The point about lightweight tripods being used more often is spot on. The clear separation between phone and camera options also makes it easier for beginners to choose. Overall, very helpful and experience-based recommendations.
Nice guide! A tripod really helps capture stable and professional shots, especially for travel content.
Great and quality, impressive scale!
Great recommendations! I love how you highlighted the versatility of these tripods for both phones and cameras. It’s so useful for capturing those travel moments with stability. I’m definitely considering the options you mentioned for my next adventure!
The Peak Design Travel Tripod supporting up to 20 lbs and extending to 60 inches caught my attention right away! It’s amazing how versatile it is for professional-looking travel photos and timelapses. Imagine using this for capturing the northern lights during a cozy trip up north, sounds exciting, doesn’t it?
Great insights! I’ve been looking for a versatile tripod that works well for both my camera and smartphone. The options you highlighted seem practical and affordable. I can’t wait to try out the one you recommended for hiking trips! Thank you for sharing!
Great post, Renee! As someone who loves capturing travel memories, I completely agree that having the right gear makes all the difference. Your tripod recommendations are spot-on—especially the point about using interval shooting to get those natural, unposed shots.
It got me thinking: just like a tripod gives you stability and creative freedom for photography, **Paint 3D** gives you that same flexibility for digital creativity. Whether I’m tweaking a 3D model of a travel souvenir or adding fun stickers to a vacation photo, Paint 3D has become my go‑to tool for quick edits and playful designs. It’s lightweight (in terms of system resources) and surprisingly powerful—much like the travel tripods you highlighted.
Thanks for sharing this guide—it’s inspired me to pack smarter and maybe even try a few new angles on my next trip!
Looking forward to seeing which tripod you recommend and your tips for choosing the right one!
Great recommendations in this post! I’m especially interested in the lightweight options for hiking. I love the versatility of the tripods that work for both phones and cameras. Can’t wait to try some of these on my next adventure!
Just like choosing the best travel tripod of 2026 helps you capture every moment with ease, this UP Scholarship last-date page helps students plan and secure their applications without missing deadlines. Clear, useful, and timely — thanks for the great info!
Very informative post! Just like having the right tools makes travel easier, an updated NREGA Job Card List helps workers quickly verify their registration, work details, and wage status. Regularly checking the list improves transparency and ensures timely benefits under MGNREGA.
Thank you for sharing this — great suggestions for travel tripods!
Fantastic roundup of the best travel tripods for 2023! It’s essential for capturing stunning shots on the go. For great accessories to complement your gear, don’t miss hansenglassinc!
I’ve been researching the best travel tripods of 2023 and found some fantastic options for both phones and cameras. Lightweight and compact designs are essential for my travels. I love tripods that offer versatility and stability, making it easy to capture stunning shots no matter where I am. They truly enhance my photography!
Incredible photos and pack of usefull info. Thanks, guys! Still in search of 1.5m height lightweight tripod for artwork process shooting.
Thanks for sharing the informative article.
Oh my heavens!! This was such a blessing!! Thank you for your organized blog and helpful articles with working links! I can’t thank you enough!
Oh my heavens!! This was such a blessing!! Thank you for your organized blog and helpful articles with working links! I can’t thank you enough!
Such a too good information about the best laptop photo editing thanks for sharing this article. I love to edit photos and videos. this is really helpful.